The Anatomy of a WebGPU Program
For those who want to learn graphics programming but don’t know where to start
August 2, 2023
You might be like me and want to learn high performance graphics programming, but are not interested in using the often intimidating C/C++ APIs for OpenGL. Luckily, there’s a new kid on the block. WebGPU is the next generation API for accessing the GPU through the browser. Unlike WebGL, it is accessible outside of the browser and supports general purpose compute! You also gain a modern graphics API with cross platform support. For the vast majority of people, WebGPU is more than adequate. Entire games have been built using it. However, If you have come to extract every last drop of performance, this might not be the API for you.
I am new to the game, but I would like to share my high level understanding of WebGPU for those of you without any prior GPU programming experience. My goal is to convey the flow of the program instead of diving into the details of configuring WebGPU to work. If you are looking for step by step directions on building your first graphics program, I can highly recommend this tutorial for Rust and this one for Javascript but also is a great reference.
My snippets will be based on a program I wrote using wgpu (the Rust WebGPU implementation)
that displays a spinning pentagon.

What is the computer doing behind the scenes?
At its core, GPUs are massively parallel, number-crunching machines. This is an ideal tool for computer graphics. Any surface we see can be approximated as a collection of triangles glued together. And as the number of triangles goes up, so does the apparent quality of our computer generated object. Computing lots of triangles becomes an unwieldy problem very fast.

You might ask why this job can’t be handled by the CPU. It can, but it’s like using a pocketknife for a very specialized machine screw. The CPU is meant to be general purpose and has a much wider variety of instructions to support. On the other hand, a GPU is like a hyper-specialized power drill whose sole purpose is to crank out a few kinds of screws insanely fast. You can use a mental shortcut to determine if your problem is suitable for a GPU. A CPU may have a few large problems to solve while a GPU may have thousands of tiny problems to solve.
The relationship between programming languages and the GPU wasn’t all that clear to me before starting. I thought that programming a GPU was the same as compiling and running C++ code for another architecture. But in fact, the GPU does not execute a C/C++/Rust/etc binary. The role of the programming language, and by extension the CPU, is to configure and supply commands to be processed by the GPU, sort of like requests and responses in web development.
Afterwards, your GPU executes a short program on the data sent in using what is known as a shader language. This is like a stripped down programming language that contains only commands that are understood by the GPU, mostly mathematical operations like addition, subtraction, multiplication, etc.
This fact is key to understanding what WebGPU does. It is so important that I
will repeat it again.
The role of the programming language is to configure and supply the data to be processed by the GPU. Afterwards, your GPU executes instructions on the data using a shader language.
What does a shader do?
The shader language used by WebGPU is known as the WebGPU Shader Language (WGSL) as it is creatively named. It has a likeness to Rust in regards to syntax, but it has some quirks. See this resource for a proper introduction.
To answer the question, it depends. WebGPU has three different kinds of shaders that can be used. A vertex shader, fragment shader, and compute shader. The first two are used for graphics specifically while the third is used for general compute.
The purpose of the vertex shader can be easily understood as function that transforms (if necessary) the vertices sent by the CPU. It is a one-to-one mapping of vertices that is deterministic. For example, you might want to make a vertex shader that rotates all the vertices by 90 degrees. This shader function has an input of a single vertex, but the GPU scales this operation to thousands of vertices at a time.
// Pseudocode
fn vertex_shader(in: Vertex) -> Vertex;
The fragment shader is quite interesting. It takes the processed vertices and computes what color that should be displayed for that vertex. This could be used for a ray tracer which determines what color to display based on the amount of light that hits it.
// Psuedocode
fn fragment_shader(in: Vertex) -> RGBA;
If you were to run a fragment shader on three vertices, each being assigned red, green, and blue, you would expect the pixel for each vertex to be a certain color.

However, what you get is this:
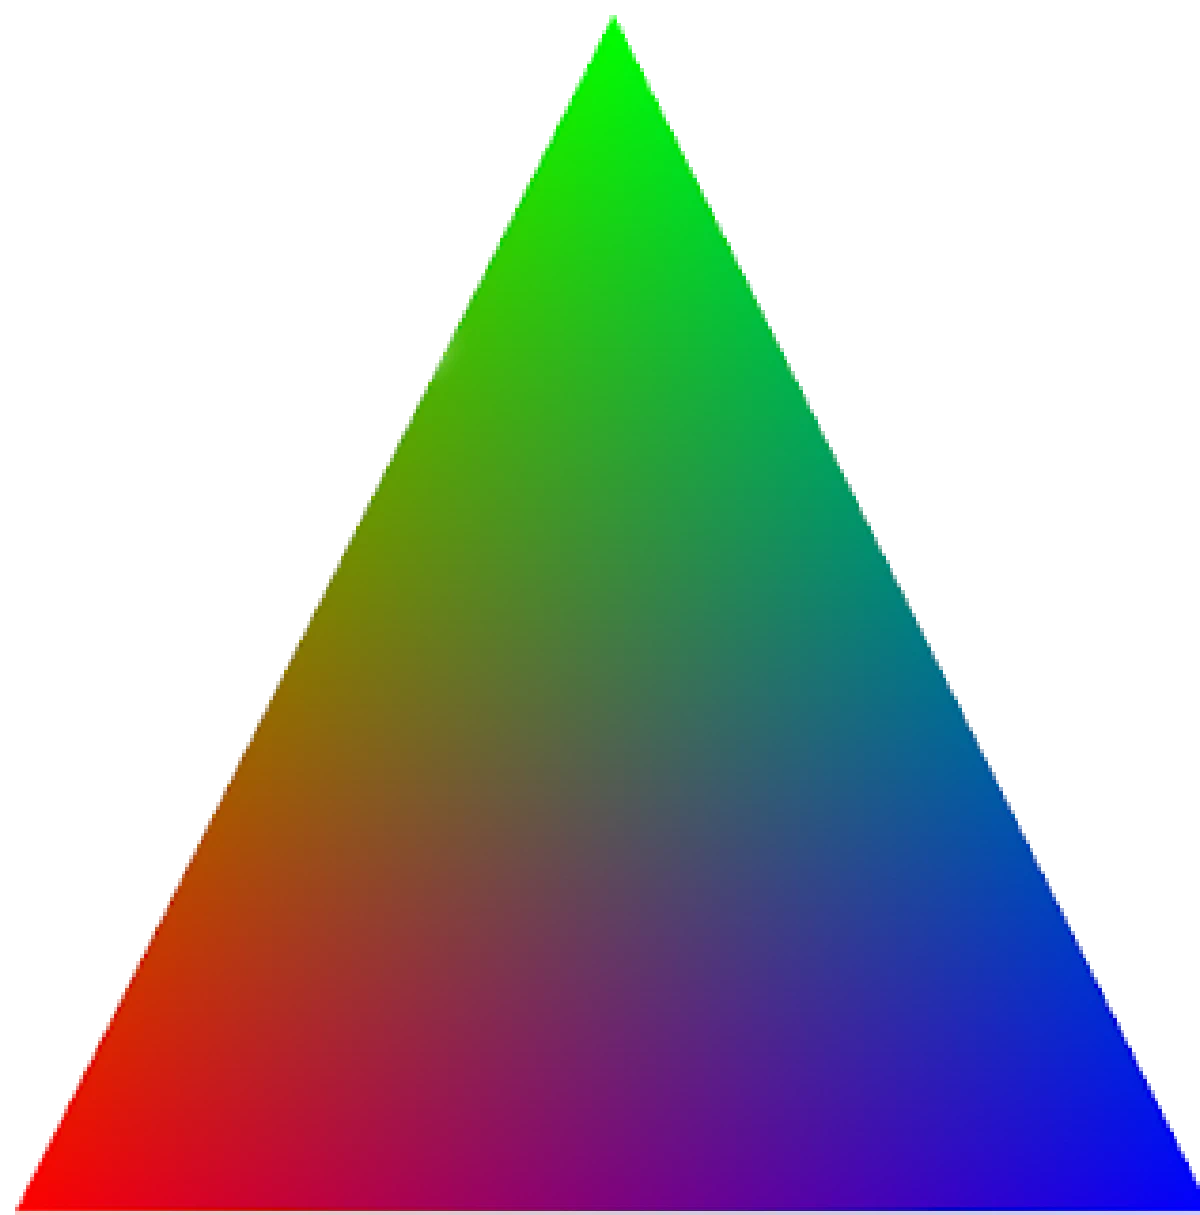
Somehow from specifying only 3 colors we ended up with a triangle that contains the whole rainbow! This is a result of interpolation and rasterization.
A rasterizer essentially takes in the outline of a shape and can color in the empty space. Like a person doing a coloring book.
Interpolation is the cousin to extrapolation. Extrapolation is making a prediction about a new value outside of your dataset, assuming that a trend holds. Meanwhile interpolation makes a prediction about a value that is contained within your dataset.
As the computer we don’t know what color the inside of the triangle should be, but maybe we make the assumption that the pixels inside the triangle should be a mix of the three colors depending on how close a point is to each corner.
You can see that as you are closer to the blue color, the more blue
it is. So for any associated parameters of the Vertex passed in, like color, the GPU
will interpolate it based on the position to fill in the blanks. You can find a
more detailed explanation of the algorithm used by OpenGL in this StackOverflow
post.
With some significant oversimplification, the whole process of graphics programming (for the scope of this mini-project) boils down to this:
- (CPU) Provide a window/canvas for the GPU to draw to.
- (CPU) Configure the GPU for your workload and shaders.
- (CPU) Handle any window events like clicks, re-draws, etc.
- (CPU) Modify and/or send vertex data to the vertex shader.
- (GPU) Run the vertex shader.
- (GPU) Run the fragment shader.
- (CPU) Repeat steps 3-6.
Cutting through the WebGPU jargon
So far we haven’t talked about anything specific to WebGPU, but now I would like to give some illumination as to what some common objects represent. Here is what my program state looks like. This struct contains the most useful objects to keep track of while running the program.
struct State {
    // bare minimum program state
    window: winit::window::Window,,
    size: winit::dpi::PhysicalSize<u32>,
    surface: wgpu::Surface,
    config: wgpu::SurfaceConfiguration,

    device: wgpu::Device,
    queue: wgpu::Queue,

    // Additional state for the the pentagon
    vertex_buffer: wgpu::Buffer,
    index_buffer: wgpu::Buffer,
    animation: AnimationState,
    render_time: u128,
    color: wgpu::Color,
    mode: PipelineMode,
    pipelines: HashMap<PipelineMode, wgpu::RenderPipeline>,
}
The Window and Surface
The Window and Surface go hand in hand. The surface represents the place that WebGPU
writes pixel data, which is most likely a window but could be a web canvas.
Surface is specific to the wgpu implementation. SurfaceConfiguration
contains information about the window’s size and a few other parameters.
The window also gives us access to events like mouse clicks, key presses, and
more. A particularly handy one is the Event::RedrawRequested.
You can time how long it takes to render a frame in order to animate the pentagon.
match event {
    Event::WindowEvent { ref event, window_id } if same_window(window_id) => {
        // Handle events
    },
    Event::RedrawRequested(window_id) if same_window(window_id) => {
        // v------------- this is very useful!
        let start = SystemTime::now().duration_since(UNIX_EPOCH).unwrap().as_nanos();
        match state.render() {
            Ok(_) => {}
            Err(wgpu::SurfaceError::Lost) => state.resize(state.size),
            Err(wgpu::SurfaceError::OutOfMemory) => *control_flow = ControlFlow::Exit,
            // All other errors (Outdated, Timeout) should be resolved by the next frame
            Err(e) => eprintln!("{:?}", e),
        }
        let end = SystemTime::now().duration_since(UNIX_EPOCH).unwrap().as_nanos();
        state.render_time = end - start;
    },
The Device and Adapter
The adapter is essentially the wrapper around the graphics API for your system. WebGPU sends native GPU calls on your behalf while you use the standardized interface. For every GPU you intend to use, you need an adapter since it may have a different API.
Confusingly, the Device object is not referring to your entire GPU.
WebGPU was intended for use in browsers with multiple tabs potentially accessing
the same resources. A Device provides compartmentalized access to your GPU.
Pipelines and Buffers
Pipelines are the entrypoint of shader programs and are executed at every render pass. You can have multiple pipelines to render different effects and composite all of them together on one image. For example, you could have one shader pipeline render a triangle mesh and overlay that ontop of the results of your standard rendering pipeline.
When we discussed shaders earlier, I mentioned that the shader can receive
vertex data. A vertex can be any struct you define, not limited to x, y, z
coordinates. You may choose to also include color information.
/// bytemuck::Pod means that the struct is "Plain Old Data" and
/// is interpretable as &[u8].
/// bytemuck::Zeroable means that struct attributes can be set
/// to 0 (references cannot be zeroed)
#[repr(C)]
#[derive(Copy, Clone, Debug, bytemuck::Pod, bytemuck::Zeroable)]
pub struct Vertex {
    pub position: [f32; 3],
    pub color: [f32; 3],
}
However, the GPU needs to know how the Buffer is layed out in memory. The
number of vertices in a 1,000 byte buffer depends on how much memory a single
vertex consumes. The array_stride is how large a single vertex is. For the
fields of this struct to be correctly interpreted, the offset is used to
indicate how far from the start of this vertex is the start of the next field.
In this example, position has no offset. Meanwhile color is offset by however
large position is.
For the more visual minded, here is a graphic.

There is a macro that can automatically generate the memory layout of Vertex,
but for the sake of completeness here is how to describe the layout.
(I apologize for how atrocious the syntax highlighting is. Chroma sucks.)
/// Creates a description of the memory layout of the Vertex struct
pub fn description() -> wgpu::VertexBufferLayout<'static> {
    wgpu::VertexBufferLayout {
        // Width of a single vertex
        array_stride: std::mem::size_of::<Vertex>() as wgpu::BufferAddress,
        step_mode: wgpu::VertexStepMode::Vertex,
        attributes: &[
            wgpu::VertexAttribute { // Represents position
                offset: 0, // offset from the start of the vertex struct
                shader_location: 0, // used by wgsl to populate its struct
                format: wgpu::VertexFormat::Float32x3,
            },
            wgpu::VertexAttribute { // Represents color
                offset: std::mem::sizeof::<[f32, 3]>() as wgpu::BufferAddress,
                shader_location: 1,
                format: wgpu::VertexFormat::Float32x3
            }
         ]
    }
You may notice the shader_location field. This is important for our shader
code. In one of my shaders I have a struct that looks almost exactly like the
Vertex struct. The @location(0) attribute tells WebGPU to map the position
VertexAttribute to this field of the WGSL struct. It is unfortunately a little
redundant, but it is the way of the world.
// Vertex struct passed in by rust code through buffer
struct VertexInput {
    @location(0) position: vec3<f32>,
    @location(1) color: vec3<f32>
}

// Vertex shader code
@vertex
fn vs_main(model: VertexInput) -> VertexOutput {
    var out: VertexOutput;
    out.color = model.color;
    out.clip_position = vec4<f32>(model.position, 1.0);
    return out;
}
The Queue
This is how we can send commands to the GPU for processing.
One command that is really useful is queue::write_buffer(). This can update any buffer object
with new data. For example, when I animate my pentagon I apply a linear
transformation to rotate the vertices. But those updated vertices do not
get sent over to the GPU until I queue them up.
I originally thought that the GPU would automatically update the vertex buffer
if I modified the reference to which Buffer was initialized with. I think this is a nice example of how the borrow
checker actually works for the programmer instead of against them.
It would be impossible for me to mutate my array of vertices if
the buffer retained a read only reference. Therefore, Buffer must retain a copy
of the memory and not a reference.
pub fn update(&mut self) {
    self.animation.rotating_pentagon(self.render_time);
    self.queue.write_buffer(
        &self.vertex_buffer, // the buffer object to update
        0 as wgpu::BufferAddress, // offset to overwrite a specific section of memory
        bytemuck::cast_slice(&self.animation.vertices) // the new data
    );
}
Concluding thoughts
This was not an exhaustive guide to WebGPU by any means, but hopefully I have imparted some appreciation and motivation on how to use WebGPU. As someone who has only recently started to learn about graphics programming, I have found the combination of WebGPU and Rust to be an intuitive pair of tools to use. I’ll be sure to share any of my other learnings as I build more complex graphical applications!
If you notice any errors or have any other feedback, please contact me here!